1.1-6 Morrison Hotel
Sun Grid Engine Quick Start |
|
| Back to Main Documentation Page |
Open Grid Scheduler/Grid Engine is a free and open-source batch-queuing system for distributed resource management. OGS/GE is based on Sun Grid Engine, and maintained by the same group of external (i.e. non-Sun) developers who started contributing code since 2001.
If you share a cluster with other users, a batch schedule allows for optimal sharing among users. Grid Engine is a robust batch scheduler that can handle large workloads across entire organizations. You can find more detailed information in the Administrators Guide (pdf), the Users Guide, and Release Notes.
At a basic level, Sun Grid Engine (SGE) is very easy to use. The following sections will describe the commands you need to submit simple jobs to the Grid Engine. The command that will be most useful to you are as follows
A more convenient queue status package called userstat can also be used. Userstat combines qstat, qhost, and qdel into a simple easy to use "top" like interface. Each command will be described below. Additional information on these commands is available by using man command-name
Important: before you use SGE you must load the SGE module:
$ module load sge6
You can include this command in your .bashrc or .cshrc file to avoid entering it
each time you login.
Submitting a job to the queue: qsub
Qsub is used to submit a job to SGE. The qsub command has the following syntax:
qsub [ options ] [ scriptfile | -- [ script args ]]
Binary files may not be submitted directly to SGE. For example, if we wanted to submit the "date" command to SGE we would need a script that looks like:
#!/bin/bash
bin/date
If the script were called sge-date, then we could simply run the following:
$ qsub sge-date
SGE will then run the program, and place two files in your current directory:
sge-date.e#
sge-date.o#
where # is the job number assigned by SGE. The sge-date.e# file contains the output from standard error and the sge-date.o# file contains the output form standard out. The following basic options may be used to submit the job.
-A [account name] -- Specify the account under which to run the job
-N [name] -- The name of the job
-l h rt=hr:min:sec -- Maximum walltime for this job
-r [y,n] -- Should this job be re-runnable (default y)
-pe [type] [num] -- Request [num] amount of [type] nodes.
-cwd -- Place the output files (.e,.o) in the current working directory.
     The default is to place them in the users home directory.
-S [shell path] -- Specify the shell to use when running the job script
Although it is possible to use command line options and script wrappers to submit jobs, it is usually more convenient to use just a single script to include all options for the job. The next section describes how this is done.
Job Scripts
The most convenient method to submit a job to SGE is to use a "job script". The job script allows all options and the program file to placed in a single file. The following script will report the node on which it is running, sleep for 60
seconds, then exit. It also reports the start/end date and time as well as
sending an email to user when the jobs starts and when the job finishes.
Other SGE options are set as well. The example script
can be found here as well.
#!/bin/sh
#
# Usage: sleeper.sh [time]]
#        default for time is 60 seconds

# -- our name ---
#$ -N Sleeper1
#$ -S /bin/sh
# Make sure that the .e and .o file arrive in the
# working directory
#$ -cwd
#Merge the standard out and standard error to one file
#$ -j y
/bin/echo Here I am: `hostname`. Sleeping now at: `date`
/bin/echo Running on host: `hostname`.
/bin/echo In directory: `pwd`
/bin/echo Starting on: `date`
# Send mail at submission and completion of script
#$ -m be
time=60
if [ $# -ge 1 ]; then
   time=$1
fi
sleep $time

echo Now it is: `date`
The "#$" is used in the script to indicate an SGE option. If we name the script sleeper1.sh and then submit it to SGE as follows:
qsub sleeper1.sh
The output will be in the file Sleeper1.o#, where # is the job number assigned by SGE. Here is an example output file for the sleeper1.sh script. When submitting MPI or PVM jobs, we will need additional information in the job script. See below.
Preserving Your Environment
If you want to make sure your current environment variables
are used on you SGE jobs, include the following in
your submit script:
#$ -V
Queue Status: qstat
Queue status for your jobs can be found by issuing a qstat command. An example qstat issued by user deadline is shown below.
job-ID  prior   name       user   state submit/start at   queue  slots ja-task-ID
---------------------------------------------------------------------------------
 304 0.60500 Sleeper4   deadline    r     01/18/2008 17:42:36 cluster@norbert  4
 307 0.60500 Sleeper4   deadline    r     01/18/2008 17:42:37 cluster@norbert  4
 310 0.60500 Sleeper4   deadline    qw    01/18/2008 17:42:29                  4
 313 0.60500 Sleeper4   deadline    qw    01/18/2008 17:42:29                  4
 316 0.60500 Sleeper4   deadline    qw    01/18/2008 17:42:29                  4
 321 0.60500 Sleeper4   deadline    qw    01/18/2008 17:42:30                  4
 325 0.60500 Sleeper4   deadline    qw    01/18/2008 17:42:30                  4
 308 0.53833 Sleeper2   deadline    qw    01/18/2008 17:42:29                  2
More detail can be found by using the -f option. An example qstat -f issued by user deadline is shown below.
[deadline@norbert sge-tests]$ qstat -f
queuename                      qtype used/tot. load_avg arch          states
----------------------------------------------------------------------------
cluster@node0                  BIP   2/2       0.00     lx26-amd64
    310 0.60500 Sleeper4   deadline     r     01/18/2008 17:43:51     1
    313 0.60500 Sleeper4   deadline     r     01/18/2008 17:43:52     1
----------------------------------------------------------------------------
cluster@node1                  BIP   2/2       0.00     lx26-amd64
    310 0.60500 Sleeper4   deadline     r     01/18/2008 17:43:51     1
    313 0.60500 Sleeper4   deadline     r     01/18/2008 17:43:52     1
----------------------------------------------------------------------------
cluster@node2                  BIP   2/2       0.00     lx26-amd64
    310 0.60500 Sleeper4   deadline     r     01/18/2008 17:43:51     1
    313 0.60500 Sleeper4   deadline     r     01/18/2008 17:43:52     1
----------------------------------------------------------------------------
cluster@norbert                BIP   2/2       0.02     lx26-amd64
    310 0.60500 Sleeper4   deadline     r     01/18/2008 17:43:51     1
    313 0.60500 Sleeper4   deadline     r     01/18/2008 17:43:52     1

############################################################################
 - PENDING JOBS - PENDING JOBS - PENDING JOBS - PENDING JOBS - PENDING JOBS
############################################################################
    316 0.60500 Sleeper4   deadline     qw    01/18/2008 17:42:29     4
    321 0.60500 Sleeper4   deadline     qw    01/18/2008 17:42:30     4
    325 0.60500 Sleeper4   deadline     qw    01/18/2008 17:42:30     4
    308 0.53833 Sleeper2   deadline     qw    01/18/2008 17:42:29     2
To look at jobs for all users, you must issue the following:
qstat -u "*"
For queue details, you may add the -f option as shown above. If you prefer to always see all user jobs, you can use the alias command to make this the default behavior. For bash users add the following to your .bashrc file.
alias qstat='qstat -u "*"'
For c shell users, the following can be added to your .cshrc file:
alias qstat 'qstat -u "*"'
Even more data information can be obtained by using the -F option (see the qstat man page for more information. For parallel jobs, the output is not very easy to understand. See userstat for a better display of the data. In the above listing, the stat is either qw (queue waiting), t (transferring), and r (running). A full table of the possible job status is given in the table below:
| Category | State | SGE Letter Code |
| Pending: | pending | qw |
| Pending: | pending, user hold | qw |
| Pending: | pending, system hold | hqw |
| Pending: | pending, user and system hold | hqw |
| Pending: | pending, user hold, re-queue | hRwq |
| Pending: | pending, system hold, re-queue | hRwq |
| Pending: | pending, user and system hold, re-queue | hRwq |
| Pending: | pending, user hold | qw |
| Pending: | pending, user hold | qw |
| Running | running | r |
| Running | transferring | t |
| Running | running, re-submit | Rr |
| Running | transferring, re-submit | Rt |
| Suspended | job suspended | s, ts |
| Suspended | queue suspended | S, tS |
| Suspended | queue suspended by alarm | T, tT |
| Suspended | all suspended with re-submit | Rs, Rts, RS, RtS, RT, RtT |
| Error | all pending states with error | Eqw, Ehqw, EhRqw |
| Deleted | all running and suspended states with deletion | dr, dt, dRr, dRt, ds, dS, dT, dRs, dRS, dRT |
Why Won't My Jobs Run ?
There are several reasons why a job will not run. The first reason is
due to the job resource requirements. It is possible that the cluster
is full and you have to wait for available resources (processors etc.)
It is also possible the job may have experienced and error in the run script. In which case the status would be "Eqw". You can query a job's status by entering the following:
qstat -explain c -j _Job-ID_where _Job-ID_ is the Grid Engine job number.
Deleting a Job: qdel
Jobs may be deleted by using the qdel command as follows:
$ qdel job-id
The job-id job number is the number assigned by SGE when you submit the job using qsub. You can only delete you jobs.
Host/Node Status: qhost
Node or host status can be obtained by using the qhost command. An example listing is
shown below.
HOSTNAME             ARCH       NPROC  LOAD   MEMTOT   MEMUSE   SWAPTO   SWAPUS
-------------------------------------------------------------------------------
global               -              -     -        -        -        -        -
node000              lx24-amd64     2  0.00     3.8G    35.8M      0.0      0.0
node001              lx24-amd64     2  0.00     3.8G    35.2M      0.0      0.0
node002              lx24-amd64     2  0.00     3.8G    35.7M      0.0      0.0
node003              lx24-amd64     2  0.00     3.8G    35.6M      0.0      0.0
node004              lx24-amd64     2  0.00     3.8G    35.7M      0.0      0.0
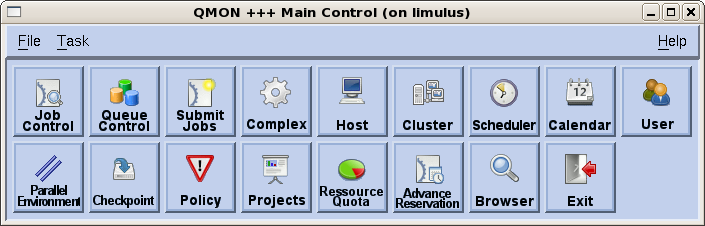
Graphical User Interface
And the following control panel will be available:
Virtually all command line tasks are available with qmon.
Summary Status: userstat
The general commands are as follows:
Queue And Host Window Specific Commands
Both windows can scroll. A "+"indicates that the window will scroll further.
You can use the Up and Down Arrow keys or Page Up and Page Down keys to move through the list.
Both windows are updated by pressing the space bar. The windows will update automatically
after 20 seconds if the space bar has not been pressed.
The Batch Queue Window has the following features. The top line shows the total jobs in the queue
and the number of active jobs. Active jobs may be running or transferring into or out of the
cluster. An entry for each job is displayed in the batch window. The JobID, Priority, Name, User,
State, Submission/Start time and the number of CPUs is provided. Only active jobs have CPUs
assigned to them.
The nodes for a specific job can be viewed by placing the cursor on the job name and then
pressing the Return (Enter) key. The following figure illustrates this command.
A job may be deleted by placing the cursor on the job and entering d.
The user must confirm the deletion by entering y. In some cases, a delete will not work.
In these cases, the user may be required to enter a qdel -f JOB-ID by hand or
request that root delete stubborn jobs.
Simple sorting can be done on the Batch Queue window.
See the j,u, and p commands above.
The a command will restore all jobs to the batch queue window.
The Hosts (Node) Window has the following features. The top line shows the total nodes and number
of down nodes (i.e. nodes that are not part of the batch system). If the nodes for a specific
job are being displayed, the JOB-ID will be displayed on this line. The next line is a summary
line for the cluster. Total CPUs, Load (5 minute), Memory, Memory Use, Swap, and Swap Use are shown.
Below this line are the numbers for each individual node. If a node is down, it has "*" around
the node name. (i.e. *nodename*) If the cursor is placed on a node and the Enter key is pressed, a top snapshot for the node will be displayed.
Nodes can be sorted by nodename or by job (entering the return key on a job from from the
batch queue window.) All nodes can be redisplay by entering a a in the Hosts window.
Submitting parallel jobs is very similar to submitting single node jobs (as shown above). A parallel
job needs a pe parallel environment assigned to the script. The following is an
annotated script for submitting an MPICH job to SGE.
The important option is the -pe line in the submit script. This variable must be
set for the MPI environment for which you compiled your program. The following example
submit scripts are available:
To use SGE with MPI simply copy the appropriate scripts to your working directory, edit the
script to fill in the appropriate variables, rename it
to reflect your program and use qsub to submit it to SGE.
This page, and all contents,
are Copyright © 2007-2013 by Basement Supercomputing,
Bethlehem, PA, USA, All Rights Reserved. This notice must appear on all
copies (electronic, paper, or otherwise) of this document.
Open Grid Scheduler (Grid Engine) comes with graphical user interface called
# qmon
Userstat displays node statistics and the batch queue for a cluster. It uses the output from the
qhost and qstat commands. The display has two main windows. The top window is the batch queue
and the bottom window is the nodes window. An example display is shown below.
![[Userstat display]](../images/userstat1.png)
q - to quit userstat
h - to get a help screen
b - to make the batch queue window active (default)
n - to make the nodes window active
spacebar - update windows (windows also update automatically every 20 seconds)
up_arrow - to move though the jobs or nodes window
down_arrow - to move though the jobs or nodes window
Pg Up/Down - move a whole page in the jobs or nodes window
Queue Window Commands:                  Host Window Commands:
  j - sort on job-ID                     s - sort on system hostname
  u - sort on user name                  a - redisplay all hosts
  p - sort on program name               return - top snapshot for node
  a - redisplay all jobs                 *nodename* means node is down
  d - delete a job from the queue
  return - display only the nodes for that job
  (When sorting on multiple parameters all matches are displayed.)
![[Userstat display]](../images/userstat2.png)
Parallel Submit Scripts
#!/bin/sh
#
# EXAMPLE OPEN MPI SCRIPT FOR SGE
# Modified by Basement Supercomputing 1/2/2006 DJE
# To use, change "OMPI_JOB", "NUMBER_OF_CPUS"
# and "OMPI_PROGRAM_NAME" to real values.
#
# Your job name
#$ -N OMPI_JOB
#
# Use current working directory
#$ -cwd
#
# Join stdout and stderr
#$ -j y
#
# pe request for OpenMPI. Set your number of processors here.
# Make sure you use the "ompi" parallel environment.
#$ -pe ompi 2
#
# Run job through bash shell
#$ -S /bin/bash
#
# Send mail at submission and completion of script
#$ -m be
# The following is for reporting only. It is not really needed
# to run the job. It will show up in your output file.
echo "Got $NSLOTS processors."
#
# Use full pathname to make sure we are using the right mpirun
/opt/mpi/openmpi-gnu4/bin/mpiexec -np $NSLOTS OMPI_PROGRAM_NAME